Microsoft has moved the Azure DevOps pipelines agent from version 4.x to version 5.x. I've updated the script from my original quickstart to match, and it's still running happily on my Mac Mini.
Not much has changed. The v5 agent still ships as a native ARM64 build for Apple Silicon and the setup process is the same. There are two things to know before you start.
What's changed in v5?
The agent now runs on .NET 10 instead of .NET 8. The runtime is bundled with the agent, so there's nothing extra to install. It also doesn't affect what you build. Your pipelines still use whatever SDKs you've installed on the machine.
The bigger one is macOS support. .NET 10 needs macOS 14 Sonoma or later (Sonoma, Sequoia and Tahoe are all supported on both x64 and ARM64). macOS 13 Ventura is no longer supported. If your build Mac is still on Ventura, upgrade macOS before you upgrade the agent.
It's worth moving across sooner rather than later too. Only the 5.x agent gets security patches going forward.
Installation
The install is a single script now. Give it a name and it creates a folder for the agent, downloads and extracts it, then runs the setup and starts the service. Each agent gets its own folder, so you can still run multiple build agents on the same machine without conflicts.
Note: I've tested this with agent 5.281.1 on macOS Sonoma and above.
Install script
Copy the following into an install-ado-agent.sh file. There's nothing to edit.
#!/usr/bin/env zsh
#usage: install-ado-agent.sh <agent-name> [agent-version]
set -e

AGENT_NAME="$1"
AGENT_VERSION="${2:-${AGENT_VERSION:-}}"
AGENT_ARCH="${AGENT_ARCH:-}"

if [[ -z "${AGENT_NAME}" ]]; then
    echo "Usage: $0 <agent-name> [agent-version]"
    exit 1
fi

#the v5 agent requires macOS 14 (Sonoma) or later
MACOS_MAJOR=$(sw_vers -productVersion | cut -d. -f1)
if (( MACOS_MAJOR < 14 )); then
    echo "macOS $(sw_vers -productVersion) is not supported by the v5 agent. Please upgrade to macOS 14 (Sonoma) or later."
    exit 1
fi

#pick the right package for this Mac (this still detects Apple Silicon if the terminal is running under Rosetta)
if [[ -z "${AGENT_ARCH}" ]]; then
    if [[ "$(sysctl -n hw.optional.arm64 2>/dev/null)" == "1" ]]; then
        AGENT_ARCH="osx-arm64"
    else
        AGENT_ARCH="osx-x64"
    fi
fi

#look up the latest stable (non pre-release) agent version if one wasn't specified
if [[ -z "${AGENT_VERSION}" ]]; then
    echo "Looking up the latest agent version..."
    AGENT_VERSION=$(curl -fsSL "https://api.github.com/repos/microsoft/azure-pipelines-agent/releases/latest" | sed -nE 's/.*"tag_name": *"v([^"]+)".*/\1/p')
    if [[ -z "${AGENT_VERSION}" ]]; then
        echo "Couldn't determine the latest version. Pass one in from https://github.com/microsoft/azure-pipelines-agent/releases"
        exit 1
    fi
fi
echo "Installing agent '${AGENT_NAME}' (${AGENT_ARCH} ${AGENT_VERSION}) into ./${AGENT_NAME}..."

#don't touch an agent that's already been configured
if [[ -f "./${AGENT_NAME}/.agent" ]]; then
    echo "Agent '${AGENT_NAME}' is already configured in ./${AGENT_NAME}. Remove it first if you want to reinstall."
    exit 1
fi

mkdir -p "./${AGENT_NAME}"
cd "./${AGENT_NAME}"

#download and extract the agent if it isn't already here
if [[ ! -f "./config.sh" ]]; then
    AGENT_FILENAME="vsts-agent-${AGENT_ARCH}-${AGENT_VERSION}.tar.gz"
    AGENT_URL="https://download.agent.dev.azure.com/agent/${AGENT_VERSION}/${AGENT_FILENAME}"
    echo "Downloading '${AGENT_URL}'..."
    curl -fL -o "./${AGENT_FILENAME}" "${AGENT_URL}" || { echo "Download failed. Check the agent version."; rm -f "./${AGENT_FILENAME}"; exit 1; }
    xattr -c "./${AGENT_FILENAME}"
    echo "Extracting..."
    tar zxf "./${AGENT_FILENAME}"
    rm "./${AGENT_FILENAME}"
else
    echo "Agent files already present. Skipping download."
fi

#register the agent, then install and start it as a service
./config.sh
./svc.sh install
./svc.sh start

echo "Done. Agent '${AGENT_NAME}' is installed and running from $(pwd)."
Then run it from wherever you want your agents to live, passing in the name for your agent:
mkdir -p ~/ado-agents && cd ~/ado-agents
zsh ./install-ado-agent.sh ado-au-m3
That creates ~/ado-agents/ado-au-m3 with everything inside it. If you chmod +x the script, you can drop the zsh and just run ./install-ado-agent.sh ado-au-m3.
Compared to the original script:
- The agent name is a parameter. No more editing variables at the top of the file, and you can run the same script again to add a second agent.
- No hardcoded version. The script pulls the latest release from the azure-pipelines-agent repo, which skips pre-releases. To pin a version, pass it as the second argument:
zsh ./install-ado-agent.sh ado-au-m3 5.281.1. The version number is the release tag on that page without the leadingv. - It picks the right architecture. Apple Silicon gets the arm64 agent and Intel Macs get x64.
- It does the setup for you. Rather than printing a command for you to run, it goes straight into the config and installs the service.
- It fails early. It stops straight away on macOS older than Sonoma, and
curlnow fails cleanly instead of saving an error page as the.tar.gz.
The agent keeps itself up to date once it's registered, so the version you install is just a starting point.
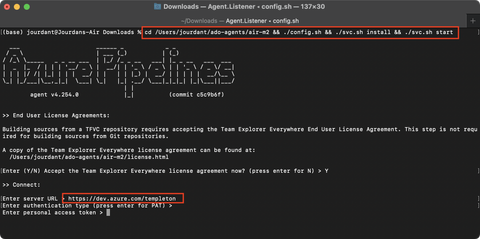
Once the download finishes, you'll be guided through a setup process that has you type in the base URL to your Azure DevOps instance and enter a Personal Access Token (PAT) with permissions to enrol the build agent.
To create a PAT with the correct permissions, navigate to https://dev.azure.com/{your_org_name}/_usersSettings/tokens and click New Token.
Give it a name and a short expiry is fine, this PAT is only required to enrol the build agent. After this process, the PAT is not required for the on-going running of the build agent.
The only permission you need for enrolling new build agents is the Agent Pools: Read & Manage scope. This can be found by clicking Show All at the bottom of the scopes list.
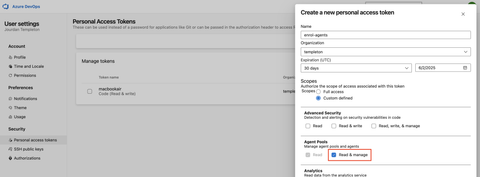
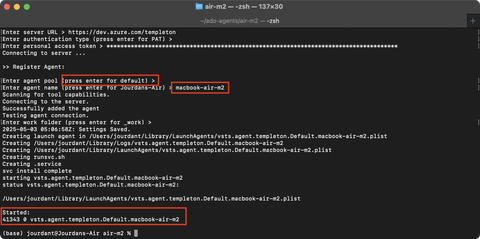
Paste the PAT back into the setup script and continue with the process. It's important to assign your agent to the correct Agent Pool.
Unless you have a complicated setup, often assigning to the Default pool is totally fine. You may choose to assign it to a new pool specifically for ARM64 Macs for example.
Once the configuration is complete, the script will proceed to install the service and start it. You should see that indicated on the output too.
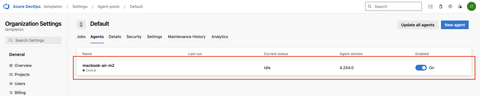
You'll also see that reflected in the Azure DevOps portal immediately with the state of your newly registered agent.
At this point, you're all done! Same recommendation as last time: make sure you have homebrew installed, and make sure it's the native arm64 homebrew. This will enable all the tasks like Install Node.js to execute correctly from a pipeline.
Upgrading an existing v4 agent
If you set up an agent with my original post, you don't need to start again. Agents update themselves when a pipeline needs a newer version. You can also kick off an update yourself in the portal under Organization Settings > Agent pools > {your pool} > Agents > Update all agents.
Be careful if you're still on Ventura. The automatic update doesn't check whether your OS supports .NET 10, so the update can fail or the agent might not start afterwards. Upgrade macOS to Sonoma or later first, then update the agent.
To check which version an agent is on, look at the Agent version column in the agent pool, or run ./config.sh --version from the agent's directory.
If you'd rather start fresh, uninstall the old agent (see the FAQ below) and run the script with a new name.
Frequently Asked Questions
-
Do I need to install .NET 10 first? No. Everything the v5 agent needs is bundled with it. The .NET version your pipelines build with depends on the SDKs you've installed on the machine.
-
Can I stay on the 4.x agent? I wouldn't. Azure Pipelines regularly ships features that need newer agents, and your pipelines will fail if there's no agent on the right version. The exception is Azure DevOps Server. The latest Server release still uses the 4.x agent, so stick with my original post for now.
-
Can I run the x64 version on my Apple Silicon Mac? Yes. I tried this first, but it runs under the Rosetta compatibility runtime. This is less efficient and things don't work as smoothly. For example, if you need to execute homebrew, it will expect the x64 version and that will expect to install x64 binaries. It's not worth it.
-
How do I uninstall an agent? Make sure you are in the directory where the agent files were extracted, then run
./svc.sh stopand./svc.sh uninstall. Then run./config.sh removeto unregister it from Azure DevOps (or remove it from the portal) and delete the directory. -
Can an Apple Silicon Mac build for Windows and Linux too? Yes. This is why it's my favourite platform for doing builds. This way a single build agent can compile apps for iOS and macOS, as well as building assets to run on Linux and Windows too. I currently have this working for a number of projects.
-
Can I use the script above for my x64-based device running macOS? Yes. The script detects an Intel Mac and downloads the x64 agent for you. You'll still need Sonoma or later.
//jourdant